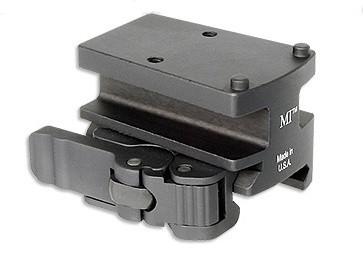
Midwest QD Optic Mount for Trijicon RMR Lower 1/3 provides a stable platform for quick detach functionality, allowing you to switch optics seamlessly. Its precision clamping mechanism ensures that your rail surfaces remain undamaged while maintaining a secure fit. Weighing only 2.9 oz, this mount offers a lightweight solution that does not compromise on strength or durability. The hard coat anodized 6061 aluminum construction is built to withstand harsh conditions, making it suitable for both competitive shooting and tactical applications.
With a user-friendly design, this optic mount features tool-free adjustments, allowing for easy customization of tension to fit various rail conditions. The patented QD lever enhances reliability and ensures that you can quickly detach and reattach your optic without losing zero. Aimed at serious marksmen and hunters alike, the Midwest QD Optic Mount is made in the USA and comes backed by a lifetime warranty, ensuring quality and trust with every purchase.
| Feature | Details |
|---|---|
| Weight | 2.9 oz |
| Material | 6061 Aluminum |
| Finish | Hard coat anodized |
| Mount Type | QD (Quick Detach) |
| Compatibility | Trijicon RMR |
| Adjustment | Multi-facetted nut, tool-free |
“This optic mount is a game changer. It holds zero perfectly even after multiple detachments!” – John D.
“I love how light it is! Perfect for long days out in the field.” – Sarah M.
“The quality is outstanding! Highly recommend for anyone using a Trijicon RMR.” – Mike L.
How does the Midwest QD Optic Mount for Trijicon RMR Lower 1/3 perform in the field?
This mount is engineered for quick detach functionality, ensuring reliable performance in various scenarios, from tactical situations to hunting expeditions. Users frequently share their satisfaction with its ability to stay zeroed after multiple uses.
Can I adjust the mount without any special tools?
Yes, the Midwest QD Optic Mount allows for tool-free adjustments, making it simple for users to optimize tension based on their specific rail conditions.
Is this mount suitable for all rail types?
While ideally designed for mil-spec rails, this mount can fit non-machined rails as well, ensuring versatility for various firearms.
Looking for more high-quality mounts? Explore our complete collection at Midwest Industries. Check out the Midwest QD Mount for Aimpoint or the Midwest QD Mount for EOTech for optimal performance tailored to your shooting style. Discover what works best for you!
Here’s some of our most similar products people are buying. Click to discover trending style.