Description
Elevate your shooting accuracy with the 
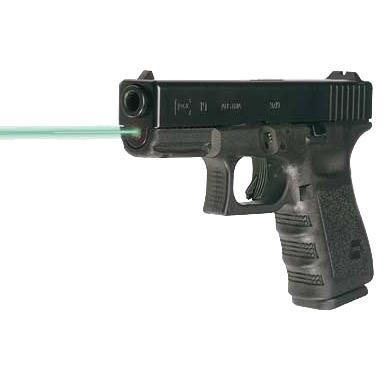
LaserMax Guide Rod Laser for Glock 19 23 32 and 38 Gen 1-3 - Green Laser. Designed explicitly for these models, this guide rod laser replaces the factory spring guide assembly, providing you with a high-intensity green laser sighting system. Imagine the clarity and precision it offers, helping you spot your target even in low light conditions. Perfect for tactical range shooting or outdoor competitions, this laser ensures you hit your mark with confidence.
Installation is a breeze – no gunsmithing or special tools required. Crafted from rugged components like aircraft-grade aluminum, you’ll enjoy durability and reliability. With the LaserMax Guide Rod Laser, you’re not just enhancing your firearm; you’re elevating your overall shooting experience. Whether you’re in a competitive setting or just honing your skills, the superior visibility and effortless handling this product provides will change the way you engage with your Glock.
Features – Key Benefits Bullets
- ENHANCED VISIBILITY for low-light conditions, ensuring you can spot your target with precision.
- EASY INSTALLATION without gunsmithing, allowing for a quick upgrade that’s user-friendly.
- DURABLE CONSTRUCTION made from aircraft-grade aluminum, providing long-lasting reliability even under tough conditions.
- USER-FRIENDLY SWITCH designed for ambidextrous operation, promoting safe firearm handling for all users.
- MINIMAL GRIP IMPACT ensures your ability to maintain a natural grip and select your holster without restriction.
- MAXIMUM ACCURACY with guaranteed alignment, helping you achieve center of mass shots every time.
- PULSING LASER for superior visibility, improving target identification in various environments.
- REPLACEMENT GUIDE ROD integrates seamlessly with your Glock, enhancing its functionality without compromising aesthetics.
Technical Specifications Table
Specification | Details |
---|---|
Compatibility | Glock 19, 23, 32, 38 Gen 1-3 |
Laser Color | Green |
Material | Aircraft-grade aluminum |
Dimensions | Standard Glock dimensions |
Weight | Approximately lightweight for ease of use |
What’s in the Box?
- LaserMax Guide Rod Laser
- User Manual
- Warranty Information
Customer Reviews
"The LaserMax Guide Rod Laser transformed my Glock! Easy to install and incredibly accurate." - John D.
"I love the green laser; it really stands out in low light. Highly recommend!" - Emily R.
FAQ
1. How do I install the LaserMax Guide Rod Laser?
Installation is quick and easy, requiring no special tools or gunsmithing. Simply replace the factory guide rod with the LaserMax unit, following the included instructions.
2. Does the laser affect grip or holster compatibility?
No, the internal design of the LaserMax Guide Rod Laser does not restrict grip or holster selection, allowing for a natural hold on your Glock.
3. How bright is the green laser?
The green laser is designed for high visibility, ensuring superior performance even in low-light conditions, making it ideal for tactical use.
4. Is the laser durable?
Yes, it features rugged construction with aircraft-grade aluminum, ensuring long-lasting durability under various shooting conditions.
5. How does this compare to other laser sights?
The LaserMax Guide Rod Laser offers easy installation and a design that maintains the integrity of the firearm’s original layout, providing unique benefits over traditional external laser sights.
Similar Models
Looking for more options? Explore our complete collection of LaserMax products including models tailored for other Glock series and firearms. Discover innovative solutions designed for enhanced accuracy and performance. Don’t miss out on the chance to elevate your shooting experience!
Our Guarantees
FREE Fast Shipping Over $99
Enjoy complimentary expedited shipping on all orders over $99.
Secure Payments
Shop with confidence using our encrypted payment processing.
High Quality or Money Back
Not satisfied with your purchase? We'll refund your money, no questions asked.
Top-Notch Support
Our expert team is available to answer all your questions and provide assistance.
What Our Customers Say
Optics Knowledge Center
Understanding Rifle Scope Basics
Magnification
Magnification refers to how much larger an object appears through the scope compared to the naked eye. Fixed power scopes have one magnification setting, while variable power scopes offer a range (e.g., 3-9x).
Objective Lens
The objective lens is the front lens that gathers light. Larger objective lenses (measured in mm) gather more light, providing brighter images in low-light conditions but add weight and require higher mounting.
Reticle
The reticle (crosshair) is the aiming point inside the scope. Modern scopes offer various reticle designs, from simple duplex crosshairs to complex ballistic reticles with holdover points for different distances.
Adjustments
Rifle scopes have turrets for windage (horizontal) and elevation (vertical) adjustments. These are measured in MOA (minutes of angle) or MRAD (milliradians) and allow precise aiming adjustments.
Proper Scope Mounting Guide
Select the Right Rings & Base
Choose rings that match your scope's tube diameter (typically 1", 30mm, or 34mm). Select a base compatible with your rifle's receiver. For heavy-recoiling rifles, opt for stronger mounts.
Install the Base
Clean the receiver and base thoroughly. Apply a small amount of blue Loctite to the screws. Attach the base to the receiver and torque the screws to manufacturer specifications.
Attach the Rings
Attach the bottom halves of the rings to the base. Place the scope in the rings and loosely attach the top halves. Don't fully tighten yet.
Set Eye Relief & Level
Position the scope for proper eye relief (3-4 inches) in your normal shooting position. Ensure the reticle is level using a scope leveling tool. Once positioned correctly, tighten the rings evenly in a cross-pattern.
Scope Zeroing Tips
Start Close
Begin zeroing at a shorter distance (25-50 yards) to ensure you're on paper before moving to your desired zero distance (typically 100 yards).
Use a Stable Rest
Always zero your rifle from a stable shooting position using a bench rest, sandbags, or a shooting rest to eliminate as much human error as possible.
Fire Groups
Fire 3-shot groups before making adjustments. This provides a more accurate representation of where your rifle is shooting than single shots.
Make Deliberate Adjustments
Know your scope's adjustment values (typically 1/4 MOA per click). If your group is 2 inches low at 100 yards, you'll need to adjust up 8 clicks (for a 1/4 MOA scope).
Confirm Your Zero
After making adjustments, fire another group to confirm your zero. Repeat the process until your point of impact matches your point of aim.
Document Your Settings
Once zeroed, record your settings including distance, ammunition used, and environmental conditions for future reference.
Optics Maintenance & Care
Cleaning Lenses
- Start by blowing or brushing away loose particles
- Use a lens pen or microfiber cloth for fingerprints
- For stubborn dirt, use lens cleaning solution (never household cleaners)
- Clean with gentle circular motions from center outward
Protecting Your Optics
- Always use lens caps when not in use
- Store in a dry place with silica gel packets
- Avoid extreme temperature changes
- Use a quality scope cover in harsh conditions
Regular Maintenance
- Check and tighten mount screws periodically
- Inspect O-rings and seals for damage
- Verify zero after rough handling
- Clean the exterior with a damp cloth
What to Avoid
- Never use fingers to touch lenses
- Avoid paper products (tissues, paper towels) on lenses
- Don't use acetone, alcohol, or household cleaners
- Never disassemble your scope (voids warranty)