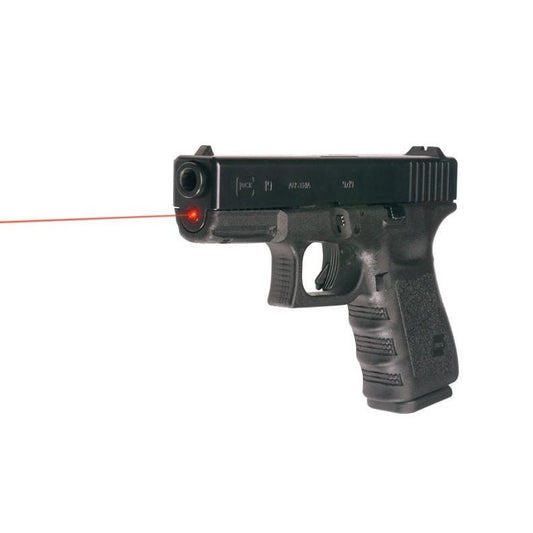
LaserMax Glock 19 IR Guide Rod Laser - Infrared enhances your shooting accuracy with a precision-focused infrared laser system. This component replaces the factory spring guide assembly in Glock models 19, 23, 32, and 38, ensuring seamless integration for improved target acquisition. The compact design ensures it won't interfere with your grip or holster, allowing for comfortable handling and accessibility in diverse shooting environments.
Installation is user-friendly and does not require specialized tools, making it an accessible upgrade for all shooters. The ambidextrous ON/OFF switch contributes to safe handling, while the proximity to the bore guarantees consistent point of aim and point of impact accuracy. Equip your Glock with the LaserMax Guide Rod Laser for enhanced confidence and precision in every shooting scenario.
| Feature | Specification |
|---|---|
| Compatibility | Glock 19, 23, 32, 38 |
| Type | Infrared Laser |
| Material | Aircraft-grade Aluminum |
| Weight | Lightweight |
| Dimensions | Compact design |
“The LaserMax makes my Glock feel even more reliable. The installation was a breeze, and I love how the laser doesn’t interfere with my grip.” - Alex T.
“I was impressed by the visibility of the infrared laser. It’s a game changer for shooting in low light.” - Jamie R.
How does the LaserMax Glock 19 IR Guide Rod Laser perform in different lighting conditions?
The infrared laser is specifically designed to provide optimal performance even in low light. It shines brightly, allowing for easy target acquisition when visibility is limited.
Is the installation process complicated?
Not at all! The LaserMax is designed for easy installation without requiring any special tools or gunsmithing. It’s a straightforward process that can be done at home.
Can I use this laser with various holsters?
Yes, the design ensures that there is no grip or holster interference, so you can use your favorite holster without any issues.
Looking for more ways to enhance your shooting experience? Discover our extensive LaserMax lineup, including models tailored for various Glock pistols. Each option offers unique features designed to meet the needs of different shooters. Explore our full collection for exceptional laser sight solutions tailored to your shooting style.
Here’s some of our most similar products people are buying. Click to discover trending style.