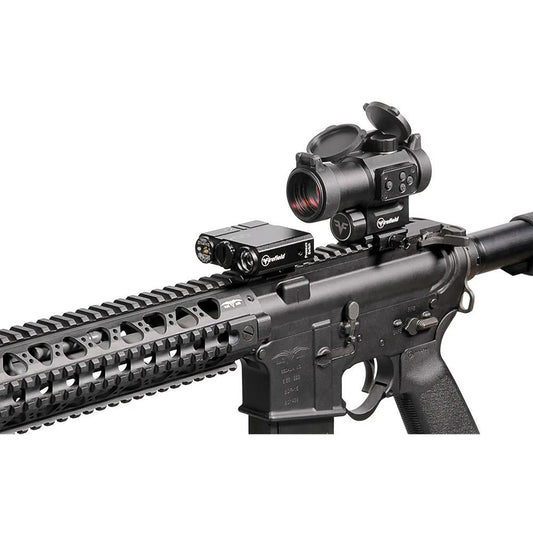
Firefield Charge AR Red Laser Sight and Flashlight enhances accuracy with its precision laser and powerful LED flashlight. Weighing only 3.4 ounces, it maintains your firearm's balance while providing a daytime visibility range of 20 yards and an impressive 300 yards at night. This combination allows for effective target acquisition in various lighting conditions.
Designed for intuitive use, it features both push-button and pressure pad controls for quick activation. Windage and elevation adjustments ensure you can fine-tune your aim for each shot. Constructed from durable aluminum with a matte black finish, this accessory is built to withstand rugged use and is compatible with both weaver and picatinny mounts.
| Specification | Details |
|---|---|
| Laser Wavelength | 630-650 nm |
| Laser Type | Red Class IIIA |
| Laser Power Output | <5 |
| Dot Size at 50 Yards | 1.5 in |
| Effective Range (Day) | 20 yds (18 m) |
| Effective Range (Night) | 300 yds (274 m) |
| LED Output | 180 lumens |
| Battery Type | CR2 |
| Weight | 3.4 oz |
| Dimensions | 2.2" x 2.25" x 1.1" |
"The Firefield Charge is a game-changer! I love the brightness and accuracy it provides." - Mark T.
"Compact and powerful, it's perfect for my AR setup!" - Jake L.
"The ease of use is fantastic. I can switch between the laser and flashlight with no hassle." - Lisa R.
How does the Firefield Charge perform in low light? The Firefield Charge excels in low-light conditions, providing a bright 180 lumens flashlight alongside a laser visible up to 300 yards at night, making it an excellent choice for nighttime hunts or tactical scenarios.
What maintenance is required for the Firefield Charge? To maintain optimal performance, ensure that the battery is replaced periodically. Additionally, keep the laser and flashlight clean and dry, away from moisture, to ensure longevity.
How does the Firefield Charge compare to other laser sights? Compared to similar products, the Firefield Charge offers superior visibility and versatility with its combined laser and flashlight features. Its lightweight design and durable construction make it a favored choice among shooters.
Can the Firefield Charge be mounted on different firearms? Yes, this laser sight and flashlight combo is compatible with both weaver and picatinny mounts, allowing for easy installation on a variety of firearms.
What is the battery life of the Firefield Charge? The CR2 battery provides a long-lasting power source, ensuring reliable performance during extended use without frequent replacements.
Looking for more innovative optics? Discover our extensive Firefield lineup, including options like the Firefield Tactical Red Dot Sight for quicker targeting and the Firefield Reflex Sight for enhanced accuracy. Explore our full collection for exceptional accessories tailored to your shooting needs.
Here’s some of our most similar products people are buying. Click to discover trending style.