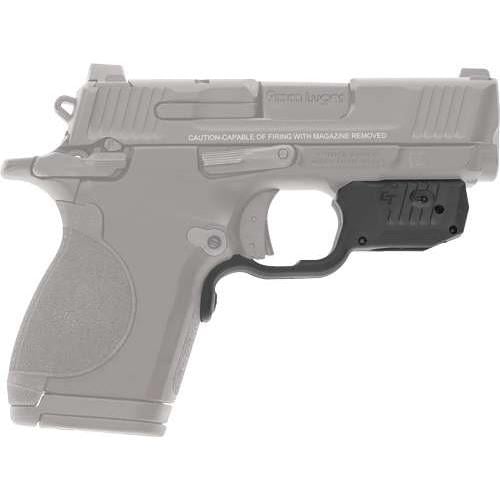
Description
Enhance your shooting accuracy and speed with the Crimson Trace Laserguard S&w Csx Red. This innovative laser sighting system is designed to dramatically improve your target acquisition in any situation. Featuring the cutting-edge Instinctive Activation technology, the laser engages automatically when you grip your firearm, eliminating the need for manual controls. With its sleek design that seamlessly integrates with your pistol, the Laserguard feels like a natural extension of your firearm, giving you that extra edge when seconds count.
Perfect for tactical range shooting, home defense, or low-light conditions, the Crimson Trace Laserguard S&w Csx Red makes it easier than ever to engage targets accurately. Whether you're practicing at the range or in a critical self-defense scenario, this laser sight ensures you can spot your targets quickly and clearly. Its robust and lightweight construction further enhances portability and durability, making it a must-have addition to your firearm accessories.
Features – Key Benefits Bullets
- INSTANT ACTIVATION – Laser turns on immediately upon gripping the firearm, providing quick readiness in critical moments.
- SEAMLESS DESIGN – A sleek, integrated solution that complements your pistol’s aesthetic, ensuring it looks like a built-in feature.
- ENHANCED ACCURACY – Improve your targeting precision, making it easier to safely handle threats in various scenarios.
- USER-FRIENDLY – No manual switches required; enjoy effortless operation for both seasoned and novice shooters.
- DURABLE CONSTRUCTION – Built to withstand the rigors of outdoor use, ensuring longevity and reliability in all conditions.
- ADJUSTABLE BEAM – Customize the laser's intensity to suit your specific shooting needs and preferences.
- COMPATIBILITY – Specifically designed to fit the S&W CSX model, ensuring a perfect fit for your firearm.
- BATTERY EFFICIENCY – Long-lasting 1/3N lithium battery for extended use without frequent replacements.
Technical Specifications
Activation | Instinctive |
Adjustable | Yes |
Battery Type | (1) 1/3N Lithium |
Beam Color | Red |
Dimensions | 2.00 x 4.35 x 5.10 inches |
Finish | Black Matte |
Laser Type | Trigger Guard |
Master On/Off Switch | Yes |
Series | CSX-R |
What’s in the Box?
- Crimson Trace Laserguard S&w Csx Red
- Installation Tools
- User Manual
Customer Reviews
“The Crimson Trace Laserguard S&w Csx Red has transformed my shooting experience! The activation is seamless, and it feels like a natural part of my firearm.” – Alex T.
“I love the clarity this laser provides, especially in low-light conditions. Highly recommend for anyone who values accuracy!” – Jamie R.
FAQ
How does the instinctive activation work?
The instinctive activation feature allows the laser to turn on when you grip the pistol. This means your focus remains on the target without fumbling with switches, making it ideal for self-defense situations.
Can I adjust the laser's brightness?
Yes, the Crimson Trace Laserguard S&w Csx Red offers adjustable settings, allowing you to customize the laser’s intensity to match your environment and personal preference.
Is it easy to install?
Absolutely! The Laserguard is designed for quick and secure mounting around the trigger guard of your S&W CSX, and all necessary tools are included.
How long does the battery last?
The 1/3N lithium battery is designed for long-lasting performance, providing many hours of use before needing replacement.
How does this compare to other laser sights?
The Crimson Trace Laserguard S&w Csx Red stands out for its instinctive activation feature, which simplifies operation in critical moments, along with its durable construction and user-friendly design.
Similar Models
If you're in the market for more great products, check out our wide range of Crimson Trace offerings. Discover options like the Crimson Trace Laserguard Pro for added features or the versatile Crimson Trace Lightguard for comprehensive lighting solutions. Explore our full collection today!
Our Guarantees
FREE Fast Shipping Over $99
Enjoy complimentary expedited shipping on all orders over $99.
Secure Payments
Shop with confidence using our encrypted payment processing.
High Quality or Money Back
Not satisfied with your purchase? We'll refund your money, no questions asked.
Top-Notch Support
Our expert team is available to answer all your questions and provide assistance.
What Our Customers Say
Optics Knowledge Center
Understanding Rifle Scope Basics
Magnification
Magnification refers to how much larger an object appears through the scope compared to the naked eye. Fixed power scopes have one magnification setting, while variable power scopes offer a range (e.g., 3-9x).
Objective Lens
The objective lens is the front lens that gathers light. Larger objective lenses (measured in mm) gather more light, providing brighter images in low-light conditions but add weight and require higher mounting.
Reticle
The reticle (crosshair) is the aiming point inside the scope. Modern scopes offer various reticle designs, from simple duplex crosshairs to complex ballistic reticles with holdover points for different distances.
Adjustments
Rifle scopes have turrets for windage (horizontal) and elevation (vertical) adjustments. These are measured in MOA (minutes of angle) or MRAD (milliradians) and allow precise aiming adjustments.
Proper Scope Mounting Guide
Select the Right Rings & Base
Choose rings that match your scope's tube diameter (typically 1", 30mm, or 34mm). Select a base compatible with your rifle's receiver. For heavy-recoiling rifles, opt for stronger mounts.
Install the Base
Clean the receiver and base thoroughly. Apply a small amount of blue Loctite to the screws. Attach the base to the receiver and torque the screws to manufacturer specifications.
Attach the Rings
Attach the bottom halves of the rings to the base. Place the scope in the rings and loosely attach the top halves. Don't fully tighten yet.
Set Eye Relief & Level
Position the scope for proper eye relief (3-4 inches) in your normal shooting position. Ensure the reticle is level using a scope leveling tool. Once positioned correctly, tighten the rings evenly in a cross-pattern.
Scope Zeroing Tips
Start Close
Begin zeroing at a shorter distance (25-50 yards) to ensure you're on paper before moving to your desired zero distance (typically 100 yards).
Use a Stable Rest
Always zero your rifle from a stable shooting position using a bench rest, sandbags, or a shooting rest to eliminate as much human error as possible.
Fire Groups
Fire 3-shot groups before making adjustments. This provides a more accurate representation of where your rifle is shooting than single shots.
Make Deliberate Adjustments
Know your scope's adjustment values (typically 1/4 MOA per click). If your group is 2 inches low at 100 yards, you'll need to adjust up 8 clicks (for a 1/4 MOA scope).
Confirm Your Zero
After making adjustments, fire another group to confirm your zero. Repeat the process until your point of impact matches your point of aim.
Document Your Settings
Once zeroed, record your settings including distance, ammunition used, and environmental conditions for future reference.
Optics Maintenance & Care
Cleaning Lenses
- Start by blowing or brushing away loose particles
- Use a lens pen or microfiber cloth for fingerprints
- For stubborn dirt, use lens cleaning solution (never household cleaners)
- Clean with gentle circular motions from center outward
Protecting Your Optics
- Always use lens caps when not in use
- Store in a dry place with silica gel packets
- Avoid extreme temperature changes
- Use a quality scope cover in harsh conditions
Regular Maintenance
- Check and tighten mount screws periodically
- Inspect O-rings and seals for damage
- Verify zero after rough handling
- Clean the exterior with a damp cloth
What to Avoid
- Never use fingers to touch lenses
- Avoid paper products (tissues, paper towels) on lenses
- Don't use acetone, alcohol, or household cleaners
- Never disassemble your scope (voids warranty)