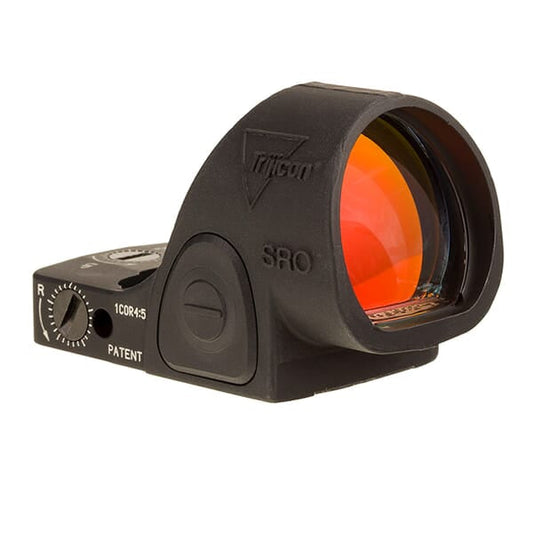
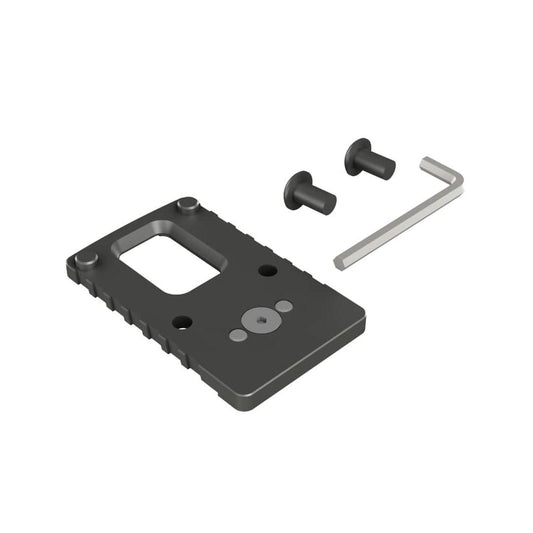
Description
Take your shooting experience to the next level with the Canik Optic Base Plate (C) for Non Optic Ready Pistols Black. This essential accessory transforms your standard Canik pistols into precision shooting machines. Designed specifically for models such as the TP9 V2, TP9 SA, and TP9 SF, this base plate allows you to mount a Trijicon RMR sight, enhancing your target acquisition speed and accuracy. Whether you're at the range or out in the field, upgrading your pistol with this optic base plate ensures you're always ready for anything.
Imagine spotting targets with ease, even in challenging environments. With the Canik Optic Base Plate (C) for Non Optic Ready Pistols Black, you gain a significant edge in tactical competitions or when hunting at dusk. It’s time to experience improved visibility and targeting precision that can make all the difference when every shot counts. Upgrade your gear and elevate your shooting performance with this reliable optic base plate.
Features – Key Benefits Bullets
- COMPATIBILITY for seamless integration with TP9 models, ensuring a perfect fit for enhanced performance.
- LIGHTWEIGHT DESIGN for easy handling, allowing you to maintain agility during shooting sessions.
- STURDY CONSTRUCTION ensures durability, providing a reliable platform for your optic under various conditions.
- QUICK INSTALLATION feature saves you time, allowing you to focus on shooting rather than setup.
- OPTIC MOUNTING allows for quick and easy attachment of Trijicon RMR sights for improved accuracy.
- ENHANCED TARGET ACQUISITION for faster aiming, ensuring you never miss a shot when it counts.
- NON-OPTIC READY ADAPTATION gives versatility, making it ideal for those who want to enhance standard pistols.
- SLEEK BLACK FINISH for a modern look that complements your firearm, enhancing your overall aesthetic.
Technical Specifications Table
Feature | Specification |
---|---|
Compatible Models | TP9 V2, TP9 SA, TP9 DA, TP9 SF, TP9 SFT, TP9 SFL |
Optic Compatibility | Trijicon RMR |
Color | Black |
Weight | 3 oz |
Dimensions | 4.5 x 1.75 x 0.5 inches |
Material | Aluminum Alloy |
What’s in the Box?
- 1 x Canik Optic Base Plate (C)
- Mounting screws
- User manual
Customer Reviews
"This base plate made my shooting experience so much better! Fast and easy to install!" - Alex J.
"Finally, I can use my Trijicon RMR on my Canik. Highly recommend!" - Sarah T.
"Sturdy and reliable. Improved my accuracy significantly!" - Mike L.
FAQ
Q: Will this base plate fit my Canik Elite Combat?
A: No, this base plate is not compatible with optic-ready models like the Elite Combat or TP9 SFx.
Q: How easy is it to install the Canik Optic Base Plate?
A: Installation is straightforward, requiring only basic tools and a few minutes to securely attach the plate to your pistol.
Q: Is this base plate durable for outdoor use?
A: Absolutely! The Canik Optic Base Plate is crafted from high-quality aluminum alloy, designed to withstand rugged conditions.
Q: Do I need any special tools to install it?
A: Standard tools are sufficient for installation, making it accessible for shooters of all skill levels.
Q: Can I use other optics with this base plate?
A: The base plate is specifically designed for the Trijicon RMR optics to ensure a proper fit and optimal performance.
Similar Models
Looking for more options? Explore our extensive Canik lineup, including models like the Canik TP9 Elite SC for enhanced concealment and the Canik TP9 SFx for competitive shooting. Discover the full collection tailored to your shooting needs and elevate your performance today!
Our Guarantees
FREE Fast Shipping Over $99
Enjoy complimentary expedited shipping on all orders over $99.
Secure Payments
Shop with confidence using our encrypted payment processing.
High Quality or Money Back
Not satisfied with your purchase? We'll refund your money, no questions asked.
Top-Notch Support
Our expert team is available to answer all your questions and provide assistance.
What Our Customers Say
Optics Knowledge Center
Understanding Rifle Scope Basics
Magnification
Magnification refers to how much larger an object appears through the scope compared to the naked eye. Fixed power scopes have one magnification setting, while variable power scopes offer a range (e.g., 3-9x).
Objective Lens
The objective lens is the front lens that gathers light. Larger objective lenses (measured in mm) gather more light, providing brighter images in low-light conditions but add weight and require higher mounting.
Reticle
The reticle (crosshair) is the aiming point inside the scope. Modern scopes offer various reticle designs, from simple duplex crosshairs to complex ballistic reticles with holdover points for different distances.
Adjustments
Rifle scopes have turrets for windage (horizontal) and elevation (vertical) adjustments. These are measured in MOA (minutes of angle) or MRAD (milliradians) and allow precise aiming adjustments.
Proper Scope Mounting Guide
Select the Right Rings & Base
Choose rings that match your scope's tube diameter (typically 1", 30mm, or 34mm). Select a base compatible with your rifle's receiver. For heavy-recoiling rifles, opt for stronger mounts.
Install the Base
Clean the receiver and base thoroughly. Apply a small amount of blue Loctite to the screws. Attach the base to the receiver and torque the screws to manufacturer specifications.
Attach the Rings
Attach the bottom halves of the rings to the base. Place the scope in the rings and loosely attach the top halves. Don't fully tighten yet.
Set Eye Relief & Level
Position the scope for proper eye relief (3-4 inches) in your normal shooting position. Ensure the reticle is level using a scope leveling tool. Once positioned correctly, tighten the rings evenly in a cross-pattern.
Scope Zeroing Tips
Start Close
Begin zeroing at a shorter distance (25-50 yards) to ensure you're on paper before moving to your desired zero distance (typically 100 yards).
Use a Stable Rest
Always zero your rifle from a stable shooting position using a bench rest, sandbags, or a shooting rest to eliminate as much human error as possible.
Fire Groups
Fire 3-shot groups before making adjustments. This provides a more accurate representation of where your rifle is shooting than single shots.
Make Deliberate Adjustments
Know your scope's adjustment values (typically 1/4 MOA per click). If your group is 2 inches low at 100 yards, you'll need to adjust up 8 clicks (for a 1/4 MOA scope).
Confirm Your Zero
After making adjustments, fire another group to confirm your zero. Repeat the process until your point of impact matches your point of aim.
Document Your Settings
Once zeroed, record your settings including distance, ammunition used, and environmental conditions for future reference.
Optics Maintenance & Care
Cleaning Lenses
- Start by blowing or brushing away loose particles
- Use a lens pen or microfiber cloth for fingerprints
- For stubborn dirt, use lens cleaning solution (never household cleaners)
- Clean with gentle circular motions from center outward
Protecting Your Optics
- Always use lens caps when not in use
- Store in a dry place with silica gel packets
- Avoid extreme temperature changes
- Use a quality scope cover in harsh conditions
Regular Maintenance
- Check and tighten mount screws periodically
- Inspect O-rings and seals for damage
- Verify zero after rough handling
- Clean the exterior with a damp cloth
What to Avoid
- Never use fingers to touch lenses
- Avoid paper products (tissues, paper towels) on lenses
- Don't use acetone, alcohol, or household cleaners
- Never disassemble your scope (voids warranty)