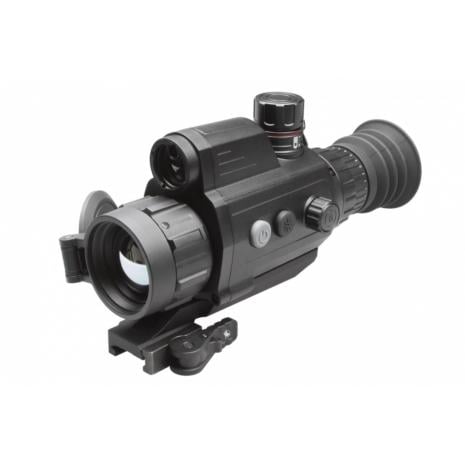
Description
The AGM VarmintV2 LRFs are the latest product family to get a heavily anticipated face lift due to AGM’s steadfast commitment to continuous improvement. The New Varmints stay true to their roots by continuing to utilize many of the popular features that were incorporated into the original Varmint LRF riflescopes like a fully integrated laser range finder a compact and lightweight housing and 18650 removable rechargeable battery power.
owever the VarmintV2 family does get some serious upgrades as well including but not limited to: an incredible new sub-20mK 12 micron thermal sensor an on-board ballistic calculator a new user interface more customizable image settings and recoil activated video with sound. Offered in both 384 and 640 resolution options the base magnification options on the four models in this family range anywhere from 2x to 4.5x which captures the entire range of hog and predator hunting scenarios. Users will surely be impressed by what the new sub-20mK thermal sensor can do when paired with a crisp high resolution OLED display. External power is always an option through the USB Type C power port and the AGM Connect app compatibility make pulling your images and videos off quick and easy as ever. Also every unit continues to ship with an American-made ADM mount which makes removing and re-mounting to multiple rifles as seamless as ever. Protected by AGM’s industry best customer service and fully transferrable 5-year warranty.
- Incredible sub-20mK 12 micron thermal sensor
- Fast 50 Hz imaging
- 1x 2x 4x 8x Digital zoom
- Adjustable color palettes
- Built-in precision eye-safe laser rangefinder
- High resolution OLED display
- On-board ballistic calculator
- Various reticle types and colors
- Picture-in-Picture mode
- Recoil-activated video with sound
- Built-in EMMC storage (16 GB)
- Wi-Fi data transmission
- Standby mode
- Up to 6 hours battery life (depending on model)
- External power supply compatible
- ADM quick release mount
Our Guarantees
FREE Fast Shipping Over $99
Enjoy complimentary expedited shipping on all orders over $99.
Secure Payments
Shop with confidence using our encrypted payment processing.
High Quality or Money Back
Not satisfied with your purchase? We'll refund your money, no questions asked.
Top-Notch Support
Our expert team is available to answer all your questions and provide assistance.
What Our Customers Say
Optics Knowledge Center
Understanding Rifle Scope Basics
Magnification
Magnification refers to how much larger an object appears through the scope compared to the naked eye. Fixed power scopes have one magnification setting, while variable power scopes offer a range (e.g., 3-9x).
Objective Lens
The objective lens is the front lens that gathers light. Larger objective lenses (measured in mm) gather more light, providing brighter images in low-light conditions but add weight and require higher mounting.
Reticle
The reticle (crosshair) is the aiming point inside the scope. Modern scopes offer various reticle designs, from simple duplex crosshairs to complex ballistic reticles with holdover points for different distances.
Adjustments
Rifle scopes have turrets for windage (horizontal) and elevation (vertical) adjustments. These are measured in MOA (minutes of angle) or MRAD (milliradians) and allow precise aiming adjustments.
Proper Scope Mounting Guide
Select the Right Rings & Base
Choose rings that match your scope's tube diameter (typically 1", 30mm, or 34mm). Select a base compatible with your rifle's receiver. For heavy-recoiling rifles, opt for stronger mounts.
Install the Base
Clean the receiver and base thoroughly. Apply a small amount of blue Loctite to the screws. Attach the base to the receiver and torque the screws to manufacturer specifications.
Attach the Rings
Attach the bottom halves of the rings to the base. Place the scope in the rings and loosely attach the top halves. Don't fully tighten yet.
Set Eye Relief & Level
Position the scope for proper eye relief (3-4 inches) in your normal shooting position. Ensure the reticle is level using a scope leveling tool. Once positioned correctly, tighten the rings evenly in a cross-pattern.
Scope Zeroing Tips
Start Close
Begin zeroing at a shorter distance (25-50 yards) to ensure you're on paper before moving to your desired zero distance (typically 100 yards).
Use a Stable Rest
Always zero your rifle from a stable shooting position using a bench rest, sandbags, or a shooting rest to eliminate as much human error as possible.
Fire Groups
Fire 3-shot groups before making adjustments. This provides a more accurate representation of where your rifle is shooting than single shots.
Make Deliberate Adjustments
Know your scope's adjustment values (typically 1/4 MOA per click). If your group is 2 inches low at 100 yards, you'll need to adjust up 8 clicks (for a 1/4 MOA scope).
Confirm Your Zero
After making adjustments, fire another group to confirm your zero. Repeat the process until your point of impact matches your point of aim.
Document Your Settings
Once zeroed, record your settings including distance, ammunition used, and environmental conditions for future reference.
Optics Maintenance & Care
Cleaning Lenses
- Start by blowing or brushing away loose particles
- Use a lens pen or microfiber cloth for fingerprints
- For stubborn dirt, use lens cleaning solution (never household cleaners)
- Clean with gentle circular motions from center outward
Protecting Your Optics
- Always use lens caps when not in use
- Store in a dry place with silica gel packets
- Avoid extreme temperature changes
- Use a quality scope cover in harsh conditions
Regular Maintenance
- Check and tighten mount screws periodically
- Inspect O-rings and seals for damage
- Verify zero after rough handling
- Clean the exterior with a damp cloth
What to Avoid
- Never use fingers to touch lenses
- Avoid paper products (tissues, paper towels) on lenses
- Don't use acetone, alcohol, or household cleaners
- Never disassemble your scope (voids warranty)